Hello Tello Pilot!
Join our DJI Tello community & remove this banner.
Sign up

Battery mod project for Tello

Ricardo Penders

Active member
Joined
Aug 7, 2021
Messages
38
Reaction score
23
Age
42
Location
Netherlands
I've started with a battery mod project for the Tello because after two years the original 3 batteries that I have are pretty much done,
two of the batteries are swollen so much that they barely fit into the drone and I can fly about 3.5 minutes with those if I fly really slow.

Surprisingly they are still working fine, I can still charge them and the drone is still flying with those very old batteries.

I measured the voltages of all three batteries and even after cycling them many, many times in the course of about two years, maybe
even three years and after I've charged them they all measure exactly 4.2 volt and when drained completely they all measure 3.968 volt
directly at the battery taps, behind the little circuit.

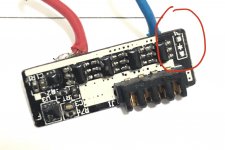
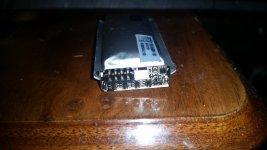
I also measured the four taps on the circuit, the connector which you can see below. The pin on the inside right next to the white square
is the only positive (+) pin, let's say that's pin 1.
The next two pins on the left side of pin 1 are the two main negative (-) pins, between the (+) and (-) of these you'll see the exact same
voltage as measured on the back side directly on the battery taps and that never changes.
The outer pin on the left is also a negative (-) pin, but between the (+) and this (-) pin I measure about 2.8 volt no matter if the battery
is just charged or fully drained.

This is just to keep in mind to have some sort of a benchmark or standard to go of before any modification is done.
20210808_104509.jpg

The official specs from the website are:

Specifications
Capacity: 1100 mAh
Voltage: 3.8 V
Battery Type: Lipo
Energy: 4.18 Wh
Net Weight: 26 g
Operating Temperature: 5℃ to 45℃

I measured the size of the battery when I got it out of the casing which is: 10mm x 25mm x 55mm (H x W x L).

These are all important things to know to find a matching 3rd party battery and ow boy, I found a seller that can deliver
pretty much unlimited battery cells that will fit exactly in the original casing and what's great is that the new batteries
are a little bit smaller in size, a few grams lighter (about 22 gr) and they hold 1200mAh.
But the best part is that the batteries only cost €1.20 - €1.33 per cell.

Here's the >> link << to the website where you can buy these cells on Alibaba and where you can find some extra info about
the manufacturer, they seem to be trustworthy and reliable to me and for the price that they sell these batteries I think
it's worth a try to get a box of 10 or 20 pcs sent to me, right?

So now that we have that out of the way I'll tell you that it is really easy to open the plastic cases of the original batteries,
you only need to carefully start on the backside which is on the other small side of the connector, you look at it when
the battery is in the drone that's the backside to me.
You can use a metal spudger, or a flat tip screwdriver or a Stanley knife but when you do that you need to start at the corners
very carefully so that you don't pierce the battery cell and cause an explosion right in your face.
But when that small backside starts to give you can take it apart just with your hands so you don't need to poke the battery
anymore.

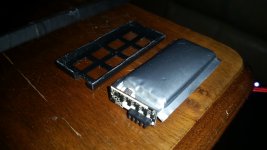
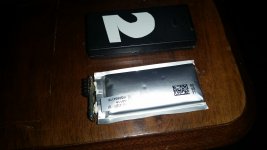
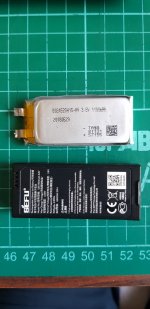
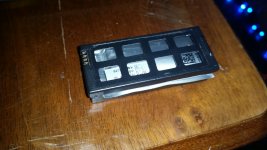
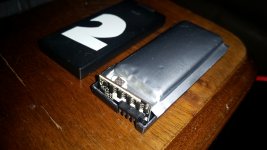
Below you can see the pictures of each step that I took to take the casing apart and take the cell out.
20210808_104131.jpg 20210808_104204.jpg

20210808_104236.jpg 20210808_104311.jpg

20210808_104412.jpg

Now at this point I'm going to buy a box of those super cheap battery cells, de-solder the circuit boards from the old battery cells,
and when the new battery cells arrive I'll solder the circuit boards to the new battery cells and hope for the best.

I don't think that there's any communication going on between the Tello drone and the batteries, just the voltage levels are important
I think but to be sure I'll charge one battery, put it into the drone without the plastic casing and turn it on and then without flying the drone
I'll hookup my oscilloscope and verify if there are any signals being transmitted.
Even when the Tello drone communicates with the batteries, changing the cell only and reusing everything else shouldn't be a problem, the
only thing that may happen is that the circuit board will reset and thinks it's a fresh new battery and that's exactly what we want.

As soon as I have the new batteries here I'll change out the old with the new cells and then after testing the flight times I'll report the results
back to this thread for all you guys.

I'm pretty excited to see if my mod is going to work and how the new batteries will perform, this could be a game changer if those
super cheap batteries are just going to work out great because the original batteries are ridiculously expensive at €25 per cell.
That means if you have to buy 3 new batteries you almost have to spend as much as the cost of a new Tello drone and I think
that it's not worth to spend that amount of cash just for a couple new batteries so either this mod is going to work or it will be the end
for me playing with the Tello which I hope isn't going to happen because I like this little drone, it's awesome.

Tell me what you think of my battery mod project, do you like it and is it going to work or not?
 
Last edited:
Great work. I am interested in your findings it sets the stage for more experiments, such as more flight time, maybe even a tethered for some occasions. Please keep us informed. You can see our work on youtube mecatx. Some of our youth pilots have ham radio licenses also.. you can contact me at [email protected].
 
  • Like
Reactions: Ricardo Penders
I've started with a battery mod project for the Tello because after two years the original 3 batteries that I have are pretty much done,
two of the batteries are swollen so much that they barely fit into the drone and I can fly about 3.5 minutes with those if I fly really slow.

Surprisingly they are still working fine, I can still charge them and the drone is still flying with those very old batteries.

I measured the voltages of all three batteries and even after cycling them many, many times in the course of about two years, maybe
even three years and after I've charged them they all measure exactly 4.2 volt and when drained completely they all measure 3.968 volt
directly at the battery taps, behind the little circuit.

I also measured the four taps on the circuit, the connector which you can see below. The pin on the inside right next to the white square
is the only positive (+) pin, let's say that's pin 1.
The next two pins on the left side of pin 1 are the two main negative (-) pins, between the (+) and (-) of these you'll see the exact same
voltage as measured on the back side directly on the battery taps and that never changes.
The outer pin on the left is also a negative (-) pin, but between the (+) and this (-) pin I measure about 2.8 volt no matter if the battery
is just charged or fully drained.

This is just to keep in mind to have some sort of a benchmark or standard to go of before any modification is done.

View attachment 6929

The official specs from the website are:

Specifications
Capacity: 1100 mAh
Voltage: 3.8 V
Battery Type: Lipo
Energy: 4.18 Wh
Net Weight: 26 g
Operating Temperature: 5℃ to 45℃

I measured the size of the battery when I got it out of the casing which is: 10mm x 25mm x 55mm (H x W x L).

These are all important things to know to find a matching 3rd party battery and ow boy, I found a seller that can deliver
pretty much unlimited battery cells that will fit exactly in the original casing and what's great is that the new batteries
are a little bit smaller in size, a few grams lighter (about 22 gr) and they hold 1200mAh.
But the best part is that the batteries only cost €1.20 - €1.33 per cell.
Here's the link to the website where you can buy these cells on Alibaba and where you can find some extra info about
the manufacturer, they seem to be trustworthy and reliable to me and for the price that they sell these batteries I think
it's worth a try to get a box of 10 or 20 pcs sent to me, right?

So now that we have that out of the way I'll tell you that it is really easy to open the plastic cases of the original batteries,
you only need to carefully start on the backside which is on the other small side of the connector, you look at it when
the battery is in the drone that's the backside to me.
You can use a metal spudger, or a flat tip screwdriver or a Stanley knife but when you do that you need to start at the corners
very carefully so that you don't pierce the battery cell and cause an explosion right in your face.
But when that small backside starts to give you can take it apart just with your hands so you don't need to poke the battery
anymore.

Below you can see the pictures of each step that I took to take the casing apart and take the cell out.
View attachment 6930 View attachment 6931

View attachment 6932 View attachment 6933

View attachment 6934

Now at this point I'm going to buy a box of those super cheap battery cells, de-solder the circuit boards from the old battery cells,
and when the new battery cells arrive I'll solder the circuit boards to the new battery cells and hope for the best.

I don't think that there's any communication going on between the Tello drone and the batteries, just the voltage levels are important
I think but to be sure I'll charge one battery, put it into the drone without the plastic casing and turn it on and then without flying the drone
I'll hookup my oscilloscope and verify if there are any signals being transmitted.
Even when the Tello drone communicates with the batteries, changing the cell only and reusing everything else shouldn't be a problem, the
only thing that may happen is that the circuit board will reset and thinks it's a fresh new battery and that's exactly what we want.

As soon as I have the new batteries here I'll change out the old with the new cells and then after testing the flight times I'll report the results
back to this thread for all you guys.

I'm pretty excited to see if my mod is going to work and how the new batteries will perform, this could be a game changer if those
super cheap batteries are just going to work out great because the original batteries are ridiculously expensive at €25 per cell.
That means if you have to buy 3 new batteries you almost have to spend as much as the cost of a new Tello drone and I think
that it's not worth to spend that amount of cash just for a couple new batteries so either this mod is going to work or it will be the end
for me playing with the Tello which I hope isn't going to happen because I like this little drone, it's awesome.

Tell me what you think of my battery mod project, do you like it and is it going to work or not?
Interesting read but no link to Alibaba..!
 
Would be nice to know what are the chips.
The 4x SOT-363 chips are clearly MOSFETs.
But what are U2 and U3?
U2 could be just power stabilizer for U3, or a temperature sensor.
U3 is some kind of battery control chip, simple BMS.

I wonder if there are any application examples for BQ24259, maybe that would be a lead about what U3 is.

EDIT:
From BQ24259 datasheet:
TS
Temperature qualification voltage input. Connect a negative temperature coefficient thermistor. Program
temperature window with a resistor divider from REGN to TS to GND. Charge suspends or Boost disable when TS
pin is out of range. A 103AT-2 thermistor is recommended.
So yeah, one of the battery pins is clearly a thermistor output.
EDIT2:
ohh, I see. The thermistor is marked "RT". So they probably used 103KT.
 
Last edited:
  • Like
Reactions: Ricardo Penders
Would be nice to know what are the chips.
The 4x SOT-363 chips are clearly MOSFETs.
But what are U2 and U3?
U2 could be just power stabilizer for U3, or a temperature sensor.
U3 is some kind of battery control chip, simple BMS.

I wonder if there are any application examples for BQ24259, maybe that would be a lead about what U3 is.

EDIT:
From BQ24259 datasheet:

So yeah, one of the battery pins is clearly a thermistor output.
EDIT2:
ohh, I see. The thermistor is marked "RT". So they probably used 103KT.
Yeah, it would be nice to know what the U2 and U3 chips are but I don't think that it is important, I've desoldered many different BMS boards off the battery cells that still worked, only the battery cell was destroyed, even the BMS boards that are switched off because of the bad battery cell or more cells and my experience is that all boards will come to life again when a new battery cell is connected.

I tried to read what's on the chips but I don't have a microscope I have to do with a simple magnifying glass and that's not enough to be able to read what's on the chips, were you able to read the numbers of the chips?

I looked at the datasheet, that chip does have I2C but it requires 3 connections and that can't be right because that wouldn't leave a pin to deliver the power to the motors, I think that the two middle pins are the negative power pins for the motors, one for the front and one for the back and the most left pin is the one that shows a lower voltage so that could be some sort of data connection but it could also be used for the internal circuitry which is the most logic thing because you want to separate the motors from the internal circuit to ensure a stable voltage rail on the internal circuitry, that's what I think that they are doing but I'll check everything with my oscilloscope just to make sure and see what actually happens when it's connected to the drone... However I don't think that there's much communication if any going on.

As long as the board isn't damaged in any way you should be able to reuse it without any problems, of course you have to make sure that the battery cell has exactly the same specs as the original one, the only thing that you can change is the capacity and the manufacturer that I found can make the cells exactly as you want them, customized to any application.
And I found on laptop BMS boards that when you disconnect the cells and then connect new cells that the board will reset itself to zero so when you plug in the revived battery and you look at the battery health stats that in most cases the cycle counter has been reset to zero and when it first said bad cells or it was completely switched off it will say that it's healthy again after taking out the bad cells and connect new cells to it... And that's not only for laptop batteries but a lot of BMS boards do reset after changing out the bad cells which is pretty cool because I haven't had to buy any BMS boards because I save the old ones that I take off for recycling.

And the one that I found which you can see via the link that I provided just happened to be the perfect match, it even has less weight (18 gram) to be exact, I said 22 gram before but it's only 18 gram and its Size is: 6.5*25*50mm which is great because the original one is a bit thicker about 8 or 9mm so they can make a new battery using the exact same dimensions as the original but pack a bit more power into the new battery because of the extra space that's left over, they show that the 6.5mm thick cell holds about 1200mAh so with the extra 2.5mm they may be able to produce a cell that holds about 1500mAh to 1800mAh, that's what I hope they can but everything above 1000mAh is a win.

Let's say they can make a 1500mAh cell with the exact dimensions as the original cell that may extend the flight time to about 20 to 25 minutes per cell, 1800mAh may get you to 30+ minutes even. That's the goal of this project.
 
UPDATE!!
Guys I already have some great news I want to share with you, today I desoldered the BMS boards from the battery cells and then I thought,
let me try and solder wires to the BMS and hook it up to my power supply to see what happens, right?

I know it's a bit bold but that's how I am, hey if you don't try you'll never know.

However as I stated before most BMS boards will come to life again after connecting a new battery cell, and I was right!!

I made a short video of it to show the Tello connected directly to my power supply and the BMS board pushed onto the pins in the Tello, I can tell you already that it is NOT a smart battery and there's no communication going on because the Tello doesn't give me any errors or battery warnings, it just works.


To view this content we will need your consent to set third party cookies.
For more detailed information, see our cookies page.
 
Last edited:
  • Like
Reactions: Bruchpilot
I'm sorry guys, I made a booboo in my last post linking to YouTube so my posts got listed to be reviewed and were hidden for I don't know how long but it's fixed again.

I changed my mistake just now in a way that does comply to the forum rules I hope ;)

And I also have an update to my experiments that I'm doing, today I tested a little battery cell that I took out of an old Bluetooth speaker which has its own BMS that I can't remove so it's a good subject for testing the charger to see if that gives any problems especially because of the extra BMS.

Well, here's the result of that in a new short video below:

To view this content we will need your consent to set third party cookies.
For more detailed information, see our cookies page.
 
  • Like
Reactions: Bruchpilot
I think that the two middle pins are the negative power pins for the motors, one for the front and one for the back and the most left pin is the one that shows a lower voltage so that could be some sort of data connection

Hm, here they state there is only one PACK- pin (though they call it GND):

Also, as I stated before - I'm almost sure one of the remaining pins is directly connected to the TS thermistor.
So that would leave only one pin which we don't know.
 
  • Like
Reactions: Ricardo Penders
Hm, here they state there is only one PACK- pin (though they call it GND):

Also, as I stated before - I'm almost sure one of the remaining pins is directly connected to the TS thermistor.
So that would leave only one pin which we don't know.
Nice GitHub page and I like to see that other people are on this topic too, I'm also on GitHub (My Profile page link for who's interested: soharddbwarez) sharing my work and working with other developers together and I even started to sponsor someone very recently since I'm using his software on my Raspberry Pi, I'm also doing some programming stuff on Arduino so I can safely say that I'm pretty much an all-round guy with experience in electrical engineering and software developing, man I started programming when I was 12 years old, that's 26 years worth of knowledge in programming in many different languages.

The only thing I will never do is making stuff compatible for Apple devices, I can do it if I have to but I don't get their logic and I just hate everything from Apple... Luckily there are enough normal people left over that are on the same page as me and if someone really wants to make things Apple compatible they are welcome to help make that possible but don't expect me to do it... LOL... That was my Apple rant and all I want to say about that.

Back to what you said, the thermistor doesn't go to any pin it's connected to one of the two chips to switch off the mosfets when the temperature is too high. It doesn't have to be able to "talk" to the Tello because it's a passive element like a resistor but it's temperature dependent that's the only difference.
I measured the pins with my multimeter already and what the guy on GitHub calls PACK which I call PIN 1 = VCC for sure, it's the only positive pin... The other three pins are all negative pins with one exception which is PIN 4 because that pin doesn't change its voltage as the two middle pins when the battery is charged or drained, the two middle pins follow exactly the voltage of the two battery taps on the backside so therefore I'm pretty much sure that the two middle pins are for the motors and PIN 4 I think is a regulated output voltage to ensure stability on the Tello circuitry itself.

If you look how other drones are constructed you see that they all follow the same kind of order and isolation for the motors and the stack of circuitry that does the communication between all the components, you have to isolate the motors because of all the high voltage spikes which will interfere with the vulnerable communication stack and make your life a hell and burn everything out when you don't isolate, and the easiest and cheapest way to do that is to use a voltage regulator which results in a very stable DC voltage which will always be somewhat less as the battery out put voltage when it's set to the maximum output voltage, I know this so well because I've made quite a few of those circuits myself over time.

However right now I'm getting everything ready and check what's going on with those 4 pins and I'll share that here with you guys, I'm gonna edit this post instead of making a new one to keep this info together not to confuse anyone. I'll share my findings on the GitHub page too with the other guy so he can add the info to the project, I'll have to see what he'll do with the info so if I don't get anywhere with the guy I'll just fork his work and make it available on my own profile page but I'll share everything here first. So watch out for the next bit below.

RESULTS and FINAL CONCLUSION

So I've tested the same battery cell that I took out of a Bluetooth speaker just to have a clean DC voltage at the battery poles on the BMS board. This will make sure that I don't see any false signals on my oscilloscope. What I tested is the charger again to see if there's any communication going on with the original BMS board connected, then I probed the four pins, as I already suspected the battery is getting charged on PIN 1 only, the two middle pins PIN 2, and PIN 3, are kept the lowest so at ground level and the last PIN 4 shows a steady DC voltage at 320 millivolt which is most likely the diode drop that I believe is from the voltage regulator, exactly as I explained in this post above.

Also as I expected, there's absolutely zero communication going on between the BMS and the charger or the Tello, the only thing used by both the charger and the Tello are simple voltage levels and the Tello may also have a way to check the current consumption on the two middle pins to recognize a bad battery but that's done internally simply by measuring the voltage sag and current usage and compare that to what's programmed into the Tello. This must be the case because the Tello is able to see when a battery doesn't have the means to deliver enough current to the motors and it will force a landing when it detects that, I know that because I tried to fly my Tello when it was cold outside about zero degree Celsius and it forced a landing after flying just one meter away from the take-off point no matter what I did to prevent it it landed anyway and the same batteries charged again but then used inside at room temperature I could fly the Tello for about 10 minutes.

But for all this you don't need any sophisticated communication between the battery BMS and the Tello or the charger, I'm sorry to disappoint anyone who really thought that the Tello has "smart" batteries, I can assure you it doesn't.
 
Last edited:
Any idea what is the diode code for the bms? I think it dropped out when I open up the battery. I want to plug in a battery but the app say it's a non original battery.
 

Attachments

  • 69B7A13D-6D95-4B21-B70C-E8A1DB07E9CB.jpeg
    69B7A13D-6D95-4B21-B70C-E8A1DB07E9CB.jpeg
    160.7 KB · Views: 53
By the way anyone knows exactly the pin out details of the battery? 1, 3, are battery positive n negative. The other 2 pin is data n clock?
 

Attachments

  • 20211209_081842.jpg
    20211209_081842.jpg
    157 KB · Views: 53
  • Screenshot_20211209-083213_Tello FPV.jpg
    Screenshot_20211209-083213_Tello FPV.jpg
    527.7 KB · Views: 46
Last edited:
I don't understand, the normal battery is for 12mn flying time for 1100mAh (according to the doc) and with your 1800mAh you claim 9mn flying time.

What is your best advise for a better flying time ?
a new official battery ?
 
He saved an old battery pack by replacing the cell with a cheaper & weaker alternative

The best standard solution is to use a fresh OEM battery. Gives 12+ minutes sedate indoor flights if you take off the prop guards.
I have seen claims of 18+min using a frankenstein-style OEM battery pack with a cell taken from the Mavic mini.
 
  • Wow
Reactions: dafaweb
UPDATE!!
Guys I already have some great news I want to share with you, today I desoldered the BMS boards from the battery cells and then I thought,
let me try and solder wires to the BMS and hook it up to my power supply to see what happens, right?

I know it's a bit bold but that's how I am, hey if you don't try you'll never know.

However as I stated before most BMS boards will come to life again after connecting a new battery cell, and I was right!!

I made a short video of it to show the Tello connected directly to my power supply and the BMS board pushed onto the pins in the Tello, I can tell you already that it is NOT a smart battery and there's no communication going on because the Tello doesn't give me any errors or battery warnings, it just works.


To view this content we will need your consent to set third party cookies.
For more detailed information, see our cookies page.
Very cool! What kind of DC power supply do you use in this case? Will this allow a tethered flight using the external DC power supply?
 

Members online

No members online now.

Forum statistics

Threads
5,758
Messages
40,274
Members
17,398
Latest member
avia_explorer