
I've started with a battery mod project for the Tello because after two years the original 3 batteries that I have are pretty much done,
two of the batteries are swollen so much that they barely fit into the drone and I can fly about 3.5 minutes with those if I fly really slow.
Surprisingly they are still working fine, I can still charge them and the drone is still flying with those very old batteries.
I measured the voltages of all three batteries and even after cycling them many, many times in the course of about two years, maybe
even three years and after I've charged them they all measure exactly 4.2 volt and when drained completely they all measure 3.968 volt
directly at the battery taps, behind the little circuit.
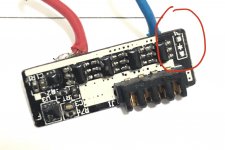
I also measured the four taps on the circuit, the connector which you can see below. The pin on the inside right next to the white square
is the only positive (+) pin, let's say that's pin 1.
The next two pins on the left side of pin 1 are the two main negative (-) pins, between the (+) and (-) of these you'll see the exact same
voltage as measured on the back side directly on the battery taps and that never changes.
The outer pin on the left is also a negative (-) pin, but between the (+) and this (-) pin I measure about 2.8 volt no matter if the battery
is just charged or fully drained.
This is just to keep in mind to have some sort of a benchmark or standard to go of before any modification is done.

The official specs from the website are:
Specifications
Capacity: 1100 mAh
Voltage: 3.8 V
Battery Type: Lipo
Energy: 4.18 Wh
Net Weight: 26 g
Operating Temperature: 5℃ to 45℃
I measured the size of the battery when I got it out of the casing which is: 10mm x 25mm x 55mm (H x W x L).
These are all important things to know to find a matching 3rd party battery and ow boy, I found a seller that can deliver
pretty much unlimited battery cells that will fit exactly in the original casing and what's great is that the new batteries
are a little bit smaller in size, a few grams lighter (about 22 gr) and they hold 1200mAh.
But the best part is that the batteries only cost €1.20 - €1.33 per cell.
Here's the >> link << to the website where you can buy these cells on Alibaba and where you can find some extra info about
the manufacturer, they seem to be trustworthy and reliable to me and for the price that they sell these batteries I think
it's worth a try to get a box of 10 or 20 pcs sent to me, right?
So now that we have that out of the way I'll tell you that it is really easy to open the plastic cases of the original batteries,
you only need to carefully start on the backside which is on the other small side of the connector, you look at it when
the battery is in the drone that's the backside to me.
You can use a metal spudger, or a flat tip screwdriver or a Stanley knife but when you do that you need to start at the corners
very carefully so that you don't pierce the battery cell and cause an explosion right in your face.
But when that small backside starts to give you can take it apart just with your hands so you don't need to poke the battery
anymore.
Below you can see the pictures of each step that I took to take the casing apart and take the cell out.


Now at this point I'm going to buy a box of those super cheap battery cells, de-solder the circuit boards from the old battery cells,
and when the new battery cells arrive I'll solder the circuit boards to the new battery cells and hope for the best.
I don't think that there's any communication going on between the Tello drone and the batteries, just the voltage levels are important
I think but to be sure I'll charge one battery, put it into the drone without the plastic casing and turn it on and then without flying the drone
I'll hookup my oscilloscope and verify if there are any signals being transmitted.
Even when the Tello drone communicates with the batteries, changing the cell only and reusing everything else shouldn't be a problem, the
only thing that may happen is that the circuit board will reset and thinks it's a fresh new battery and that's exactly what we want.
As soon as I have the new batteries here I'll change out the old with the new cells and then after testing the flight times I'll report the results
back to this thread for all you guys.
I'm pretty excited to see if my mod is going to work and how the new batteries will perform, this could be a game changer if those
super cheap batteries are just going to work out great because the original batteries are ridiculously expensive at €25 per cell.
That means if you have to buy 3 new batteries you almost have to spend as much as the cost of a new Tello drone and I think
that it's not worth to spend that amount of cash just for a couple new batteries so either this mod is going to work or it will be the end
for me playing with the Tello which I hope isn't going to happen because I like this little drone, it's awesome.
Tell me what you think of my battery mod project, do you like it and is it going to work or not?
two of the batteries are swollen so much that they barely fit into the drone and I can fly about 3.5 minutes with those if I fly really slow.
Surprisingly they are still working fine, I can still charge them and the drone is still flying with those very old batteries.
I measured the voltages of all three batteries and even after cycling them many, many times in the course of about two years, maybe
even three years and after I've charged them they all measure exactly 4.2 volt and when drained completely they all measure 3.968 volt
directly at the battery taps, behind the little circuit.
I also measured the four taps on the circuit, the connector which you can see below. The pin on the inside right next to the white square
is the only positive (+) pin, let's say that's pin 1.
The next two pins on the left side of pin 1 are the two main negative (-) pins, between the (+) and (-) of these you'll see the exact same
voltage as measured on the back side directly on the battery taps and that never changes.
The outer pin on the left is also a negative (-) pin, but between the (+) and this (-) pin I measure about 2.8 volt no matter if the battery
is just charged or fully drained.
This is just to keep in mind to have some sort of a benchmark or standard to go of before any modification is done.
The official specs from the website are:
Specifications
Capacity: 1100 mAh
Voltage: 3.8 V
Battery Type: Lipo
Energy: 4.18 Wh
Net Weight: 26 g
Operating Temperature: 5℃ to 45℃
I measured the size of the battery when I got it out of the casing which is: 10mm x 25mm x 55mm (H x W x L).
These are all important things to know to find a matching 3rd party battery and ow boy, I found a seller that can deliver
pretty much unlimited battery cells that will fit exactly in the original casing and what's great is that the new batteries
are a little bit smaller in size, a few grams lighter (about 22 gr) and they hold 1200mAh.
But the best part is that the batteries only cost €1.20 - €1.33 per cell.
Here's the >> link << to the website where you can buy these cells on Alibaba and where you can find some extra info about
the manufacturer, they seem to be trustworthy and reliable to me and for the price that they sell these batteries I think
it's worth a try to get a box of 10 or 20 pcs sent to me, right?
So now that we have that out of the way I'll tell you that it is really easy to open the plastic cases of the original batteries,
you only need to carefully start on the backside which is on the other small side of the connector, you look at it when
the battery is in the drone that's the backside to me.
You can use a metal spudger, or a flat tip screwdriver or a Stanley knife but when you do that you need to start at the corners
very carefully so that you don't pierce the battery cell and cause an explosion right in your face.
But when that small backside starts to give you can take it apart just with your hands so you don't need to poke the battery
anymore.
Below you can see the pictures of each step that I took to take the casing apart and take the cell out.
Now at this point I'm going to buy a box of those super cheap battery cells, de-solder the circuit boards from the old battery cells,
and when the new battery cells arrive I'll solder the circuit boards to the new battery cells and hope for the best.
I don't think that there's any communication going on between the Tello drone and the batteries, just the voltage levels are important
I think but to be sure I'll charge one battery, put it into the drone without the plastic casing and turn it on and then without flying the drone
I'll hookup my oscilloscope and verify if there are any signals being transmitted.
Even when the Tello drone communicates with the batteries, changing the cell only and reusing everything else shouldn't be a problem, the
only thing that may happen is that the circuit board will reset and thinks it's a fresh new battery and that's exactly what we want.
As soon as I have the new batteries here I'll change out the old with the new cells and then after testing the flight times I'll report the results
back to this thread for all you guys.
I'm pretty excited to see if my mod is going to work and how the new batteries will perform, this could be a game changer if those
super cheap batteries are just going to work out great because the original batteries are ridiculously expensive at €25 per cell.
That means if you have to buy 3 new batteries you almost have to spend as much as the cost of a new Tello drone and I think
that it's not worth to spend that amount of cash just for a couple new batteries so either this mod is going to work or it will be the end
for me playing with the Tello which I hope isn't going to happen because I like this little drone, it's awesome.
Tell me what you think of my battery mod project, do you like it and is it going to work or not?
Last edited:


")